What's new
What's new

Philabuster's Hobby Shop

Philabuster

Diamond
Joined
Jul 12, 2006
Location
Tempe, AZ
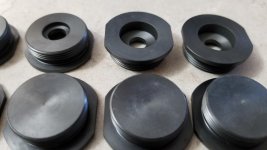
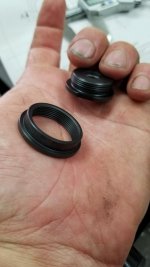
Machined my first Torlon job today. I took on the job and then looked on PM how to machine the stuff. :nutter:

Turns out this material is extremely abrasive and need to run it slow with sharp tooling like you would run titanium. Just the raw material at Ø1.25" x 24" long was $500! Customer supplied the material.

Job actually ran pretty good. This plastic is hard as a rock!

Ready for delivery on Monday. :D
 

Attachments

  • 20220430_155130_resized.jpg
    20220430_155130_resized.jpg
    84.7 KB · Views: 98
  • 20220430_155116_resized.jpg
    20220430_155116_resized.jpg
    84.2 KB · Views: 98
  • 20220430_155102_resized.jpg
    20220430_155102_resized.jpg
    93.7 KB · Views: 103
  • 20220430_114117_resized.jpg
    20220430_114117_resized.jpg
    85.3 KB · Views: 104
  • 20220430_110659_resized.jpg
    20220430_110659_resized.jpg
    86.2 KB · Views: 126

wheelieking71

Diamond
Joined
Jan 2, 2013
Location
Gilbert, AZ
Torlon is used in the semi-conductor world quite a bit. If you go at it like Delrin right away (like I did the first time) your in for a surprise! LOL
You think that is expensive, check out some Vespel. Crazy money for some "plastics".
 

alan speyrer

Stainless
Joined
Feb 15, 2009
Location
Shallowater
Your hand is huge!


Machined my first Torlon job today. I took on the job and then looked on PM how to machine the stuff. :nutter:

Turns out this material is extremely abrasive and need to run it slow with sharp tooling like you would run titanium. Just the raw material at Ø1.25" x 24" long was $500! Customer supplied the material.

Job actually ran pretty good. This plastic is hard as a rock!

Ready for delivery on Monday. :D
 

Philabuster

Diamond
Joined
Jul 12, 2006
Location
Tempe, AZ
Ran a couple more prototype parts yesterday.

Ran the first op of the large part in Big Zak, then finished it off in Junior. The reason the blank is so long is because I picked up a remnant off the rack vs having to wait until Monday for Apache Steel to saw off a piece. Remnant was cheaper anyway.

The big part is Ø4.0" OD and the small part is just under Ø1.4" OD. Both parts are made from 4140 prehard.

The deep groove was a bit of a challenge. Had to weld up a grooving tool holder to a KM50 tool in order to do the job. The groove was .150" wide x .950" deep with a full radius on the bottom.

Next step is for them to wire EDM the parts. The large part gets a chain sprocket profile on the OD and the smaller part gets an involute spline in the center.
 

Attachments

  • 20220507_102211_resized.jpg
    20220507_102211_resized.jpg
    91.8 KB · Views: 69
  • 20220507_122631_resized.jpg
    20220507_122631_resized.jpg
    92.5 KB · Views: 71
  • 20220507_122644_resized.jpg
    20220507_122644_resized.jpg
    92.5 KB · Views: 77
  • 20220507_124335_resized.jpg
    20220507_124335_resized.jpg
    92.6 KB · Views: 74
  • 20220507_125518_resized.jpg
    20220507_125518_resized.jpg
    90.2 KB · Views: 69

Philabuster

Diamond
Joined
Jul 12, 2006
Location
Tempe, AZ
Ran four more Torlon parts on Saturday and four more (different OD size) on Monday. This job runs really good.

The next job I had was a rework job modifying some hydraulic (?) piston shafts. Turn off the M14 thread and cut a M10 x 1.25 thread. 5 parts.

Had to use a small 8" scroll chuck so I could clamp on the shank diameter. The scroll chuck allows me to open the jaws far enough to clear the piston.

The customer did not want the seals to get wet with coolant. After some hours of thinking about the job, it dawned on me to just get a latex balloon and stretch it over the piston. Worked awesome. No issues with coolant on the piston seals.
 

Attachments

  • 20220510_164140_resized.jpg
    20220510_164140_resized.jpg
    88.1 KB · Views: 58
  • 20220511_143007_resized.jpg
    20220511_143007_resized.jpg
    97.3 KB · Views: 64
  • 20220511_143015_resized.jpg
    20220511_143015_resized.jpg
    89.1 KB · Views: 73
  • 20220511_152453_resized.jpg
    20220511_152453_resized.jpg
    96.4 KB · Views: 71

kustomizer

Titanium
Joined
Aug 17, 2007
Location
North Fork Idaho
Ran four more Torlon parts on Saturday and four more (different OD size) on Monday. This job runs really good.

The next job I had was a rework job modifying some hydraulic (?) piston shafts. Turn off the M14 thread and cut a M10 x 1.25 thread. 5 parts.

Had to use a small 8" scroll chuck so I could clamp on the shank diameter. The scroll chuck allows me to open the jaws far enough to clear the piston.

The customer did not want the seals to get wet with coolant. After some hours of thinking about the job, it dawned on me to just get a latex balloon and stretch it over the piston. Worked awesome. No issues with coolant on the piston seals.

Good to know that them bulk buys on condoms when we were younger wont go to waste
 

JonP

Aluminum
Joined
Sep 28, 2008
Location
N W Washington
Phil, this post may not belong here but since you are the resident educator I think you probably know how do you make left hand threads on a Mazak T32-2 control???? On a manual lathe we turn the cutter upside down and run the spindle in reverse, I just cant wrap my head around ho to do it in mazatrol, Thanks Jon P.
 

Philabuster

Diamond
Joined
Jul 12, 2006
Location
Tempe, AZ
Phil, this post may not belong here but since you are the resident educator I think you probably know how do you make left hand threads on a Mazak T32-2 control???? On a manual lathe we turn the cutter upside down and run the spindle in reverse, I just cant wrap my head around ho to do it in mazatrol, Thanks Jon P.
Cutting left hand threads is programmed exactly the same as right hand threads. You just need to get a left hand threading tool and tell the machine to run the chuck direction backwards on the tool data page. The cutting direction in Z will then be the same as when running right hand threads.

The machine does not want to cut left hand threads using a right hand tool holder.
 

JonP

Aluminum
Joined
Sep 28, 2008
Location
N W Washington
Cutting left hand threads is programmed exactly the same as right hand threads. You just need to get a left hand threading tool and tell the machine to run the chuck direction backwards on the tool data page. The cutting direction in Z will then be the same as when running right hand threads.

The machine does not want to cut left hand threads using a right hand tool holder.
Yea that all makes sence now, I just need to figure out the L H holder, when I search for L H holders they just move the insert over to the right hand side, I think I need onewhere the insert is upside down ??
 

Ox

Diamond
Joined
Aug 27, 2002
Location
West Unity, Ohio
Now that the insert is on the RH side, now flip the holder over so's the insert is close to the chuck.
Now your insert is upside down.

But now you need to edit your toolholder so's the insert is on C/L now.


The other option is to just grab a boring/threading bar, and install that the wrong way, and you are in business!

-------------------

Think Snow Eh!
Ox
 

JonP

Aluminum
Joined
Sep 28, 2008
Location
N W Washington
Yup I got it, just a regular L H tool holder, put the insert up so its close to the chuck move the spacer in the turret around so the cutting tip is on center turn the spindle backwards and its easy from there, Thanks guys for the help, Jon P.
 

Philabuster

Diamond
Joined
Jul 12, 2006
Location
Tempe, AZ
Got an email late Friday asking me to make some HOT parts. These are for the same customer as the Torlon parts.

Large OD is 1.7" and the center stub is 6mm OD with a M3 x 0.5 tapped hole in the center.

Customer asked for the parts to be made from any non-magnetic stainless, so I went with 303ss.

Parts ran pretty good. Ready for delivery on Monday.
 

Attachments

  • 20220514_103026_resized.jpg
    20220514_103026_resized.jpg
    85 KB · Views: 52
  • 20220514_153928_resized.jpg
    20220514_153928_resized.jpg
    92.9 KB · Views: 53
  • 20220514_153942_resized.jpg
    20220514_153942_resized.jpg
    81.1 KB · Views: 53

Freedommachine

Hot Rolled
Joined
May 13, 2020
Just read through this entire thread. The lack of unsolvable problems is impressive. The fact that you were able to purchase 2 machines from HGR sight unseen and get both back to complete running condition is also quite impressive. Now you've got me thinking... A quick turn could be a nice addition to my junk collection lol.

You do some very nice work Phil, thank you for sharing this thread with us.
 

Philabuster

Diamond
Joined
Jul 12, 2006
Location
Tempe, AZ
Just read through this entire thread. The lack of unsolvable problems is impressive. The fact that you were able to purchase 2 machines from HGR sight unseen and get both back to complete running condition is also quite impressive. Now you've got me thinking... A quick turn could be a nice addition to my junk collection lol.

You do some very nice work Phil, thank you for sharing this thread with us.
Thank you.

I did not get Junior (my small Mazak) fully functional just yet. The tailstock clamping cylinder was busted when I got it and I have not addressed that issue yet.
 

MotoX

Cast Iron
Joined
Nov 14, 2011
Location
Enid, Oklahoma
Got an email late Friday asking me to make some HOT parts. These are for the same customer as the Torlon parts.

Large OD is 1.7" and the center stub is 6mm OD with a M3 x 0.5 tapped hole in the center.

Customer asked for the parts to be made from any non-magnetic stainless, so I went with 303ss.

Parts ran pretty good. Ready for delivery on Monday.
What tooling did you use for the face groove/counterbore?

Ive had this type of feature come up before, and getting proper clearance for the id and the od of the stem can be tricky.

I ended up using a some homemade junk but it took longer than i would have liked.
 

Philabuster

Diamond
Joined
Jul 12, 2006
Location
Tempe, AZ
What tooling did you use for the face groove/counterbore?

Ive had this type of feature come up before, and getting proper clearance for the id and the od of the stem can be tricky.

I ended up using a some homemade junk but it took longer than i would have liked.
I didn't have a proper tool for it so I just used a .094" wide deep Kennametal Top Notch insert and hand ground the radial relief I needed on the insert.


Top