What's new
What's new

JP's shop

snowman

Diamond
Joined
Jul 31, 2004
Location
Southeast Michigan
Punchline - your corner rad process "moves" material - as opposed to re-moving material.
And it self rads - just like solder wants to sphere up.

Correct?


----------------------

Think Snow Eh!
Ox

Yes, it's just heating it to the melt point, then allowing surface tension to do its job.

I hope these are being annealed after cutting.


Sent from my iPhone using Tapatalk
 

JP Machining

Stainless
Joined
Jul 15, 2006
Location
Wisconsin
They are basically flame annealed, and due to the relatively thin walls its working fine, plus when put in to use its essentially annealed again. We have done extensive testing with the current process and it is holding up very well. Previously I tried to skip the flame polish and just use some diamond sand paper to take the sharp edges off, they would break if you looked at them the wrong way. But the way I flame polish the ends and keep a little heat on them after the polish to slow the cool time its working well. Sure it would be better to have a kiln and soak aneal a whole batch at a time, but with testing it has proven to be not needed. If they were more like 6mm thick wall tubes than yes they would need a more proper anneal. We've been working on these things for about 2 years to get everything right how we want them.
 

snowman

Diamond
Joined
Jul 31, 2004
Location
Southeast Michigan
That makes a lot of sense. Most of my glass experience is with soft glass, and that with boro was always thick. A polarscope would have been a very valueable instrument for what you are doing, at the beginning...but it sounds like you've got it figured out.

You can get a finer flame tip by using stainless hub needles. May not be applicable now, but may be some time in the future.
 

david n

Diamond
Joined
Apr 13, 2007
Location
Pillager, MN
Pretty cool..................How did you get hooked up with glass cutting? Kinda an oddity for a machine shop.......................
 

JP Machining

Stainless
Joined
Jul 15, 2006
Location
Wisconsin
Well the stoves I make he wanted the glass lantern and to get them cut to length from mfg was like $30.00 a cut. A little research on it and hey that doesn't look too hard I can cut for less than that. The commercial made machines were like $7k+ so I spent $500 on parts from surplus center and built one... I don't think I would go out looking for work cutting glass tubing but it helps be the one stop shop for all the stove parts which helps keep it here.

I learned how to cut glass and how the machine worked on a forum where alot of guys make pot pipes, they happen to use the same type of glass, just alot smaller.
 

JP Machining

Stainless
Joined
Jul 15, 2006
Location
Wisconsin
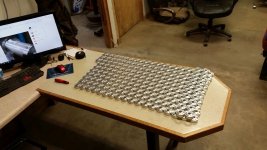
Just sitting here browsing Instagram and deburring a desk full of Semi truck wheels...
20180608_102308.jpg

Busier than heck in the shop last couple months, finally staring to see daylight again. Looking to be a good year if it keeps up this way.
 

JP Machining

Stainless
Joined
Jul 15, 2006
Location
Wisconsin
So I got a 3d printer a couple weeks ago. Just printed up a press brake punch to try out and see how long it lasts on sheet metal. This one is just PLA with %80 infill, have some carbon fiber stuff coming in to test as well. If it lasts awhile I have tons of ideas of custom little dies I can test and get right by 3d printing and then later make a final version from steel if the volume dictates it.

Due to the infill amount the tall one was a 14hr print. It feels like even this will be strong enough to do what I want easily. It matches the other tooling I use on this job except that I widened the top out a bit to spread the load a bit better into the plastic.
20180709_075532.jpg
 

Ox

Diamond
Joined
Aug 27, 2002
Location
West Unity, Ohio
14 hrs?

How is that cost effective?

I have seen other articles about printing break dies, but I'm not seeing the point as of yet.

"Just b/c we can" ???


-----------------------

Think Snow Eh!
Ox
 

JP Machining

Stainless
Joined
Jul 15, 2006
Location
Wisconsin
After you make sure the first layer goes down right and sticks to the build plate you can pretty much walk away, just occasionally check on it that something didnt shift and screw it up. The plastic is cheap, like $20 for a 1kg spool. I think the program said that punch used 240 grams worth, most things would only need 10-20% infill so would print much faster. This was at .2mm layer ht with a .4mm nozzle. I'm going to try going to thicker layers for this type of stuff as there is no 3d detail just straight walls. i think the program said switching to .3mm layer ht would make it a 9hr print. Could also get larger nozzles but then some details would be coarser, but it would print faster as well.
 

Perry Harrington

Titanium
Joined
Oct 7, 2006
Location
Klamath Falls, Oregon
You might want to give PETG a try as well. It's a PITA due to stringing and you have to slow down, but it can make some very durable parts. I seem to get more brittleness at higher temps, but it could just be cheap filament.

I had a complex part to make: My dad wanted to put a Fat Boy tank on his Fat Bob, to get 30% more capacity. The instrument panel is different on the tanks, so he cut the sheet metal mount off the bigger tank. I had to design a mount that would adapt the panel to the tank, but it's rather hard to get up inside a cast piece. I took some approximated measurements, modeled it in Fusion 360, then printed a low infill solid model with TPU filament (prints very fast). It took 3 tries, but I got a part that was just the right fit.

I then took that part and a chunk of steel and machined the steel part on the Bridgeport by taking measurements from the 3D printed part with calipers.

This part required 6 sided machining, it was a pyramid shape, had 2 parallel sides and 1 side perpendicular to the parallel side.

I used a sine bar to setup the part for machining the taper. I bolted it down to a fixture to get some of the other features.

I took a bunch of video footage, but ended up just having to get the thing done and didn't film the latter part.

So basically, I took a few caliper measurements, made a 3D model, printed it out, checked it against the parts, revised, checked, revised, checked, had a good exemplar, then made the finished part from steel and welded it to the tank. I made the part 1.5mm shorter than finished height and printed a TPU shim to act as a gasket to prevent vibration and create a resilient surface for the instrument panel to bolt to. The panel normally just crushed the rubber trim gasket that fits against the tank and runs metal to metal. Knowing Harley's propensity for vibration, I thought a gasket made of a squishy material would be ideal to help prevent any vibration (which would lead to fatigue and cracking of the welds).

FWIW, Harley used 1/4-20 stainless button head bolts to attach the IP to the tank, with some panel nuts that pop into the backside of the sheet metal mount. I was surprised they were not metric.

The IP is a cast zinc piece and it's VERY clear that they took full advantage of 3D CAD to design the mold and clearances. Those little sheet metal carriers that hold panel nuts, they actually made reliefs in the mold to clear those little fingers, that's how tight the fitup is on that part.
 

JP Machining

Stainless
Joined
Jul 15, 2006
Location
Wisconsin
Been awhile since I updated this.

Spent the day playing musical lathes. Slid the Monarch out from next to the wall waiting on buyer this next week. Then shoved the turning center up to the wall where the Monarch used to be as its a better spot for possible future upgrade with room for a barfeeder etc if I ever get that far. Got it all releveled and mostly put back together tonight.

This then leaves me a nice slot to park a new(to me) flatbed cnc lathe and plans for a small jib crane to service the Haas, new lathe, turning center and the manual mill. Getting to old for this heavy lifting crap, especially by myself.

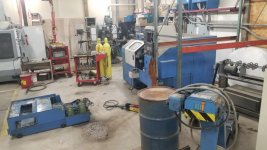
Before. I forgot to take a before, so here is one from the security cam..
192.168.0.68_Shop2_main_20191122135928.jpg
After, so far. Lots to do yet
20191206_152405.jpg
 

wheelieking71

Diamond
Joined
Jan 2, 2013
Location
Gilbert, AZ
Are you using the Enerpac as a toe-jack? I have been shopping for a jack and skates as I want to rearrange my shop. And was considering a pancake jack over a toe jack.

Your digs are looking good!
 

JP Machining

Stainless
Joined
Jul 15, 2006
Location
Wisconsin
I used a wedge cylinder and a pancake cylinder on the porta power. On the tail end I was able to use one of my track jacks.

The pancake is nice but you end up lifting in like 1/4" increments and using a bunch of pcs of aluminum to lift. I should really build a toe jack for a porta power cylinder to get in places my track jacks cant.
 

JP Machining

Stainless
Joined
Jul 15, 2006
Location
Wisconsin
Well a long day but got the new lathe in and in place. Now to set it off the skates, level, power, clean, learn...

Then I need to work on either a jib crane or workstation crane to cover both lathes and mills to make changing chucks etc more enjoyable.
20200104_191546[1].jpg
 

CBlair

Diamond
Joined
Sep 23, 2002
Location
Lawrenceville GA USA
Cool, just remember if you are going to run coolant on that thing, get a good supply of mop heads and floor cleaner. I love my TL-1 but hate to clean up the mess. Good luck and keep us informed of how it goes.

Charles
 

JP Machining

Stainless
Joined
Jul 15, 2006
Location
Wisconsin
I already have a fully enclosed one with a turret. Replacing a manual lathe and wanted one I could still run manually but also could do some quick 2nd ops etc, plus handle large parts.
 

CBlair

Diamond
Joined
Sep 23, 2002
Location
Lawrenceville GA USA
I already have a fully enclosed one with a turret. Replacing a manual lathe and wanted one I could still run manually but also could do some quick 2nd ops etc, plus handle large parts.

I really like my TL-1 but it is small for some of my needs. I will also say I wish I still had a manual lathe also. There are times when it is just the better option. For me though I didnt have the space so I had to choose and I dont regret it. I am sure you will like this machine, share some photos once you get it working.

Charles


Top