What's new
What's new

Metal 3d printing: lock escutcheon

Billtodd

Titanium
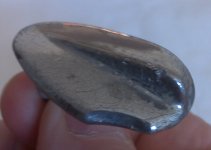
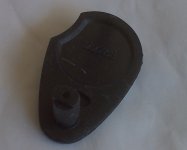
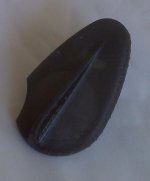
I've been ask to reproduce a lock escutcheon for a friend's classic Bentley Continental, which is apparently unobtainable else where.

I think I can model the part ok, but I'm seeking experience of others as to the best material. The original is a zinc alloy chromed, so would either something that could take plating or ,at a stretch, would polish to a mirror finish.
 

Attachments

  • IMG_20220907_104047-02.jpeg
    IMG_20220907_104047-02.jpeg
    102 KB · Views: 49
  • IMG_20220907_104040-01.jpeg
    IMG_20220907_104040-01.jpeg
    98.9 KB · Views: 48

Scottl

Diamond
Joined
Nov 3, 2013
Location
Eastern Massachusetts, USA
Apparently the way to create brass objects through 3D printing is to 3D print a wax model and investment cast it.


This article explains why copper alloys are unsuitable for 3D printing.


For a simple part such as the one you have I'd suggest making a silicone mold directly off the original (after padding any defects with epoxy, shellac, wax, or even clay) and then casting a wax investment pattern to send out for casting in brass.
 
Last edited:

MCritchley

Hot Rolled
Joined
Mar 22, 2007
Location
Milwaukee
If you go back a generation in cars to the “brass era” parts like that were brass casings filed to perfection and nickel plated. I just built some parts for a Pope Hartford touring car and noted the high level of fit and finish on each part. The guys building car must have worn out a lot of files!

If I was making a one off, it would be a CNC mill project from brass and a bunch of hand finishing.
If I didn’t have a CNC I would just rough the part out and file it to shape. It won’t take long, and you’ll get really good with a file.
 

Billtodd

Titanium
Thanks guys.

I've modelled the escutcheon, and printed a couple for testing.

I've sent the file to a firm in India to be cast in brass and will report back with the results
 

Attachments

  • IMG_20220917_104131-01.jpeg
    IMG_20220917_104131-01.jpeg
    197.3 KB · Views: 30
  • IMG_20220917_104432-01.jpeg
    IMG_20220917_104432-01.jpeg
    289 KB · Views: 30

implmex

Titanium
Joined
Jun 23, 2002
Location
Vancouver BC Canada
Hi Billtodd:
That is not a difficult part to machine from barstock, so I would have simply farmed it out to a local CNC milling shop.

You already did all the hard part by modeling it...cutting it is not very demanding by comparison.
Since you are vendoring it out anyway, it makes some sense to me to pick the process that will get you the closest to a finished part as you can get.
You could have it milled out of 303 or 316 stainless and polish it nicely...no need even for chroming it, unless you need an exact colour match to an existing part.

If it must be perfect, you cannot avoid the chroming step...even a mirror polished stainless part will be noticeably different if it's sitting in close proximity to a bunch of chromed parts; the luster and colour of chrome is really hard to mimic perfectly.

So another option to consider...you've already committed to the "cast in India" route, but if that is not successful, this is another alternative.

Cheers

Marcus
www.implant-mechanix.com
www.vancouverwireedm.com
 

Billtodd

Titanium
This needs to be chromed, since it's one of the parts where the customer meets the job, and the there's a number of other parts that are being chromed in any case

I thought about making in from barstock, manually (I could cnc the profile, but only have a 2axis machine in my garage) , but didn't fancy carving two, and farming out to cnc (i.e taking it to the works and persuading someone to make it for me, would have cost too much in favours ;⁠-⁠))

The cast in India route is cheap enough to fail 8⁠-⁠)
 

implmex

Titanium
Joined
Jun 23, 2002
Location
Vancouver BC Canada
Hi again Billtodd:
Did you know that you can get very close by running waterline toolpaths if all you have is a 2 axis machine.
If you do it in something like Fusion 360, you can adaptive rough it with a small step up like 0.005" or so, and run it with 0.001" of stock on it and a nice gentle feedrate with a small radial DOC as well.
The 3D adaptive roughing strategy is a waterline strategy with the added benefit of taking only very small bites if you need to.
It will get you a part that you can hand finish with ease...not as good as finishing it with a Scallop toolpath on a VMC, but still pretty damned nice

So all the toolpaths in that Adaptive Roughing strategy are XY toolpaths.
I don't know if that's what they're called in Fusion...I'm running HSMWorks which is basically the same thing.
Check it out...it's pretty cool.

Cheers

Marcus
www.implant-mechanix.com
www.vancouverwireedm.com
 

implmex

Titanium
Joined
Jun 23, 2002
Location
Vancouver BC Canada
Hi again Billtodd:
Here's a picture of a part in 316 Stainless I'm just cutting now:
DSCN5578.JPG

The top is being cut with a 1/8" bullnose with a 0.010" corner radius and is a scallop toolpath with a 0.005" stepover.

The bottom half is what it looked like after roughing from a solid lump with 1/2" of stock on it in places.
It was roughed with that 3D adaptive strategy using a 3/8" bullnose with a 0.010" corner radius with a 0.005" stepup and leaving 0.010" residual stock for the finishing cutter to clean up.
Radial DOC was 0.0075" and I ran the rougher at 120 IPM with MQL (refined vegetable oil).
As you can see from this shot, the roughing is already pretty good...if I was able to cut every detail with the 3/8 cutter, I could be almost good enough to polish it right from the roughing with a big buffer and coarse Greystar compound.

There were only XY moves done to get this result, and it's quite a complex surfaced part:
Here's the other half:
DSCN5580.JPG

It's part of a freaky sex toy...(don't ask!):willy_nilly:

Cheers

Marcus
www.implant-mechanix.com
www.vancouverwireedm.com
 
Last edited:

Billtodd

Titanium
Well they're here 8⁠-⁠)

And , I'm very pleased with the parts . I need to finish the top surface , I left myself material to grond back and polish, and sensibly they put the riser on that surface, so ideal.

These worked out at just under £25 a pop so not cheap but there are features that would require some thinking about to cnc.
 

Attachments

  • IMG_20220929_132048-01.jpeg
    IMG_20220929_132048-01.jpeg
    352.8 KB · Views: 16


Top