What's new
What's new

3 point vs 4 point bore probing

markpuglia

Plastic
Joined
Oct 1, 2017
Is there an advantage one way versus the other to probing a bore? On a bore gauge, they have three tangent surfaces to the bore you are measuring but in probing is the existence of a 3-point bore purely to shave cycle time, or does this help eliminate any inherent pure x or y axis error/backlash? I always would assume the more points the better (ie on a CMM probing a bore)
 

couch

Cast Iron
Joined
Jun 10, 2009
Location
Anaheim, California
Bore gages really don't tell you if a bore is round or not, just gives you a distance across (think reuleaux triangle) and don't account for lobing. Three point bore gages / ID mics mitigate error but are still pretty poor at telling you if a bore is round.

On a probing cycle, 4-Point cycles at the quadrants can give an inaccurate result depending on how your lead ins / outs are, if you have witness lines from backlash, etc. 3-Point cycles allow you to probe bores with interruptions / gaps and many allow you to specify which angle the point is taken from in relation to the centerline of the bore.

Its less about cycle time and more dependent on your requirements and part geometry.

You need to make sure if you use 3-Point probing, that you calibrate your probe this way as well.
 

mhajicek

Titanium
Joined
May 11, 2017
Location
Minneapolis, MN, USA
Well, just off the cuff, if a bore is interpolated, any axis reversal nonuniformity will be at the 90 degree points. So a four point probing cycle will align with these, making it more accurately centered, but not necessarily as accurate for size. Also, if there is any mechanical backlash in the machine, probing a point at an angle as in the three point routine may be less accurate.
 

PROBE

Hot Rolled
Joined
Jan 23, 2003
Location
Tel Aviv, Israel
Is there an advantage one way versus the other to probing a bore? On a bore gauge, they have three tangent surfaces to the bore you are measuring but in probing is the existence of a 3-point bore purely to shave cycle time, or does this help eliminate any inherent pure x or y axis error/backlash? I always would assume the more points the better (ie on a CMM probing a bore)
4 points probing will always be more reliable and accurate then 3 points. The reason is not the majority of the points (macro based probing routines are not using the least square calculation formula to find the best fit). The reason is, that exact position of the center point of the bore is not known and the measurement starts from something "close" to it. In case of 3 points routine at least 2 of the vector moves are not performed normally to bore's circumference. As the result, the exact position of the touch point on probe's sphere surface is not known and can be approximated only. This of course influences the quality of calculation of the center of the probe's sphere center at the moment of the touch. It's value is used for further calculations of bore center and diameter.
Contrary to that, the 4 point routine movements are executed parallel to machine X and Y axes, and if starting point is "close enough" to bore's center, the touches are practically performed normally to it's surface, and calculations are straight forward and reliable.

The factor of backlash is eliminated during probe's calibration process. Regarding the axes positioning error - well, I wouldn't even start to produce something on erroneously positioning machine, so of course there wouldn't be anything to measure too.

Stefan
Cogito Ergo Sum
 

sinha

Stainless
Joined
Sep 25, 2010
Location
india
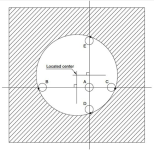
The movement along X and Y need not be close to the center. The "error" on the touch point remains symmetric, hence same at both the ends. When we take the average of the two coordinates, the center gets located exactly.
1674038166511.png
 

SteveEx30

Hot Rolled
Joined
Nov 25, 2011
Location
CANADA
I Always checked bores or standing round features with 4points. If the tolerances were very tight I would use 6 or 8 depending on the feature size. But never 3.
 

GiroDyno

Aluminum
Joined
Apr 19, 2021
Location
PNW
Are you measuring/inspecting, or trying to set WCS? I made a post about 3 vs 4-point cycles for setting WCS a couple weeks back...
I had some parts that were too large to use the stock Renishaw 4-point cycle to probe (using the OD in my case), so I switched to the Renishaw 3-point vector cycle before finally rolling my own 3-point cycle to squeeze out a few seconds of cycle time.

I found that the 3-point cycle is not as accurate as the 4-point cycle. I would probe parts back-to-back using 3/4-point cycles and generally saw a discrepancy of around 0.0030" on approx. 16" diameter parts.

If the error was too great I found that a second probing cycle using the WCS generated from the first cycle would bring the results back in line with the 4-point cycle but last I checked 3 plus 3 is 6, and 6 is more than 4... so that's not really faster.
For my application that 0.0030" was totally acceptable so I stuck with 3-points, and after making my own cycle that went straight from point-to-point instead of back to center I was about to shave our time down by ~15 seconds/part from the stock cycle, YMMV.

(This is based on my experience with x4 different Haas VF2/3SS machines in '08-'14 vintages)
 

PROBE

Hot Rolled
Joined
Jan 23, 2003
Location
Tel Aviv, Israel
The movement along X and Y need not be close to the center. The "error" on the touch point remains symmetric, hence same at both the ends. When we take the average of the two coordinates, the center gets located exactly.
View attachment 384342
Hi Sinha,
Unfortunately real life is not so simple as attached drawing:
1. Kinematic touch trigger probes, which still are vast majority in the field, are all but not symmetric.
2. The direction of the deflection of the probe approaching the surface not at normal vector is impossible to predict, and therefore the determination of the position of the probe's sphere center at the moment the trigger is generated is approximate only.
3. Therefore the 4 point bore measurement routine should have 3 steps:
3.1. Perform the first measurement between for example points B-C (X movement) on your sketch. Calculate the average value of X position from achieved readings. This value will be close enough to assure that the movement in complementary (Y in our example) axis will be normal to bore's surface. Place the probe at this position in X.
3.2. Perform the measurement in Y. The calculated result will be Y bore center's position. Move to this point .
3.3 Perform same in X.

Stefan
Cogito Ergo Sum
 

sinha

Stainless
Joined
Sep 25, 2010
Location
india
Hi Sinha,
Unfortunately real life is not so simple as attached drawing:
1. Kinematic touch trigger probes, which still are vast majority in the field, are all but not symmetric.
2. The direction of the deflection of the probe approaching the surface not at normal vector is impossible to predict, and therefore the determination of the position of the probe's sphere center at the moment the trigger is generated is approximate only.
3. Therefore the 4 point bore measurement routine should have 3 steps:
3.1. Perform the first measurement between for example points B-C (X movement) on your sketch. Calculate the average value of X position from achieved readings. This value will be close enough to assure that the movement in complementary (Y in our example) axis will be normal to bore's surface. Place the probe at this position in X.
3.2. Perform the measurement in Y. The calculated result will be Y bore center's position. Move to this point .
3.3 Perform same in X.

Stefan
Cogito Ergo Sum
I agree and appreciate your input.
 

Orange Vise

Titanium
Joined
Feb 10, 2012
Location
California
We use 3-point probing on a part with a keyway at 9 o'clock. 4-point on everything else.

Generally, keep expectations realistic wrt accuracy. In addition to all the good points made above about part geometry inconsistencies, note that your average OMP40/60 isn't all that accurate either (if you're working in tenths). Apparently the stylus pivots on some sort of tripod-like mechanism and thus "tips" somewhat unpredictably. Thus Renishaw makes a higher accuracy line of probes (OMP400/600/etc). Learned this from a Renishaw rep, whom I was seated next to at a machine tool open house.


Top