What's new
What's new

1942 10EE Round Dial Apron Oiling feed to Carriage Connection Issue

Hobby Racer

Aluminum
Joined
Apr 18, 2015
Can someone tell me if this is a factory connection or is it some previous owner's attempt at a repair?

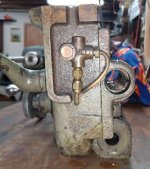
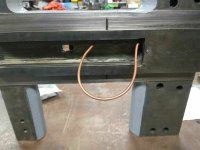
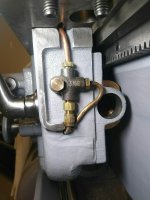
I'm trying to join my apron to the carriage and the oil supply line from the apron does not appear to connect, at least not in a way that would seal correctly. When disassembling this months ago I did not pay enough attention to the connection so I'm not sure if it was every right.

Here is pic of the apron to carriage connection with the threading dial portion removed so you can see the oiling connections. Note: the pic is upside as the carriage is on the bench.

IMG_20230111_110229813.jpg

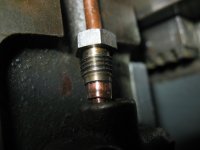
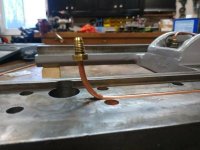
Here is close up of that strange piece on the end of the tubing. It appears to be an extension that is crimped onto the 5/32" tubing. The small diameter at the end matches the tubing diameter.

IMG_20230111_110324391.jpg
There was a traditional Bushing on the end that was screwed into the oiling "T". Not sure that was sealed as there is no crush sleeve and the bushing is a slip fit onto the extension.
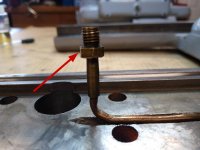
IMG_20230111_110334535.jpg

Any ideas on how to join this line back to the "T" would be appreciated. I would prefer not to have to snake a new copper line back through the carriage if I can avoid it.
 

Cal Haines

Diamond
Joined
Sep 19, 2002
Location
Tucson, AZ
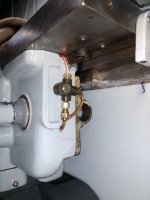
It's not under a lot of pressure, so maybe an O-ring will work. I was able to get mine to seal up using a short piece of tubing in place of the sleeve:
IMG_2492.jpg
Maybe you can bore out the back part of the bushing to allow it to slide back enough for an O-ring or crush sleeve?
 

Cal Haines

Diamond
Joined
Sep 19, 2002
Location
Tucson, AZ
Maybe go back before the bend and splice on a longer piece of tubing? I don't know if HVAC suppliers have a sleeve fitting that allows two lengths of tubing to be joined. (I'm thinking of the sweat fittings that you use to join two lengths of copper pipe.)
 

Cal Haines

Diamond
Joined
Sep 19, 2002
Location
Tucson, AZ
McMaster has brass tubing with ~5/32" ID. A length of that could be used to make a sleeve to join to sections of tubing: link

Is your tubing made of copper or copper-plated steel?
 

Hobby Racer

Aluminum
Joined
Apr 18, 2015
It's not magnetic so I'm assuming it's pure copper. Sweating is definitely an option.

Seems like every time I need something from McMaster, the shipping cost twice as much as the small part I need!
 

rakort

Hot Rolled
Joined
Apr 27, 2011
Location
Central Wisconsin
In my case that tube that supplied the carriage was janked. Yours looks to be in similar condition as mine. My recommendation is to dig that thing out of the carriage and replace it up to the manifold under the carriage. It is an intimidating process at first but not that bad as you might think and quite satisfying in the end. All those kinks and funk in the tube I'm sure won't serve you well. I've got pictures on my thread and many others not on the thread if that helps you! Go for it, dig it out, the right tubing is easy to work with.

Brian
 

Hobby Racer

Aluminum
Joined
Apr 18, 2015
I checked out your thread and your right. I've come this far, may as well do it right and dig out the line and replace it with new.

Why do they fill in the cavity in the cross feed nut area with a type of bondo filler?
 

rakort

Hot Rolled
Joined
Apr 27, 2011
Location
Central Wisconsin
So I thought I posted this last night, but apparently that didn't work! Bijur is your friend for parts. Replace all the metering elements under the saddle and the other one or two in the system. Bijur can supply you with the tube and fittings as well. There are other "aftermarket" options as well.


1.jpg

2.jpg
3.jpg

4.jpg
5.jpg

6.jpg

6.jpg

7.jpg

8.jpg

9.jpg
 

rakort

Hot Rolled
Joined
Apr 27, 2011
Location
Central Wisconsin
I checked out your thread and your right. I've come this far, may as well do it right and dig out the line and replace it with new.

Why do they fill in the cavity in the cross feed nut area with a type of bondo filler?

Again in my case, the tube was janked. It was actually replaced with a tube that was too small. At the connection points it never really sealed.

That bondo type filler I understand is melted sulfur IIRC. You can dig that out without too much work and replace it if you like with something like bondo. My tube in the cross feed area was also damaged and first replaced, then later repaired. It was a mess. I think the big issue is when it gets packed with chips during production then the chips wear on the tube. I dug all that crap out of there, replaced it with a properly sized copper tube, and skipped the "bondo" step as the tube set nicely in the groove and didn't appear to rubbing on anything it shouldn't I did have to get a bit forceful with the tube to "set it" into the groves.
 

rakort

Hot Rolled
Joined
Apr 27, 2011
Location
Central Wisconsin
Here is what mine looked like in the cross slide area after the first round of cleaning......clearly patched with solder. Not sure how they actually got solder to stick!


1673571931063.png
 

Cal Haines

Diamond
Joined
Sep 19, 2002
Location
Tucson, AZ
Brian,

Can you post some photos that show the upper part of the channel for the tube?

It looks like the hardest part of the job would be getting the tubing through the vertical hole above the manifold. Maybe you can walk us through the steps involved in installing the tubing. Did you use any tools to bend the tubing for form it by hand?
 

Hobby Racer

Aluminum
Joined
Apr 18, 2015
Well it was a lot easier than I thought it would be. For those finding this post in the future here are the steps I went through to get it done.

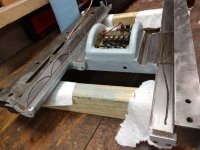
No special tools need as the copper tubing is super flexible, just don't bend it more than needed to prevent work hardening and stress cracks. Once the old tube and originally packing is removed you can see that the passage ways are straight thru drilled holes.

IMG_20230114_143119795.jpg IMG_20230114_143156251.jpg

The most difficult part is feeding the tube from one of the holes to the other inside the cavity where the cross slide nut runs. I made as large of a bend as possible and inched it thru little by little until it was as tight as I could get it by hand.

IMG_20230114_143630540.jpg IMG_20230114_144644051.jpg


IMG_20230114_144823932.jpg

After you have it as close as you can by hand, gently tap it into it's final position with something soft. I used some pieces of soft pine.

IMG_20230114_151135490.jpg IMG_20230114_151753307.jpg

And then finish the ends and your done! I did not bother to repack the cavity as everything clears the cross slide nut and is locked in place very well.

IMG_20230114_150012684.jpg
IMG_20230114_152638811.jpg
IMG_20230114_160037582.jpg
 
Last edited:


Top