What's new
What's new

Error Code 00 & 30 on a Deckel FP2NC with Dialog 4

chibbe

Plastic
Joined
Nov 30, 2007
Location
Stockholm / Edsbro
Hello All,
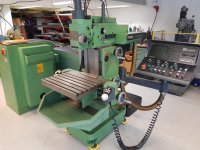
I finally ended up winning this machine at an auction, a long time sought after Deckel FP2NC 2801-1369 from 1985, what a beauty😊
20200820_144935.jpg
But of course, it doesn’t even start at all☹.
The only thing that happens is an error code on the screen appears “ BA 00 30 BA16”
+ fan in console spins and relay no K18 in the big cabinet activates.
20200820_144649.jpg
This is my first ever CNC machine (I have no experience of CNC at all, but I hope I get) and I have never got it running, by the look of it when I picked it up it wasn’t used for many years (dirty all over). I had the brief chance to chat with the previous owner of the shop (not the operator) and he told me it works but have some problems. He did not know what problems it had.

In accordance with the Dialog “minibook” the error code 30 = Fehler auf NSP 55 = fault in NSP55 board. (Mine has a NSP56 board 256K)
Code 00 = CNC schaltet wegen unterspannung ab. Pufferspeicher in ordnung. = CNC switched due to undervoltage from. Buffer in order. (This is google translate!) Don’t know what this really means?

In the Electrical Cabinet on NPP90 board got these Leds lit F5 +F6 +F7 +F8 meaning CNC hat sich noch nicht gemeldet CNC has not yet responded.
20200820_144726.jpg
& in the Bosch section, I got all the red ones lit (Treiber, Tacho, Uberspannung & Unterspannung.) Is this indicating errors? Or is it just because the Servos aint powered yet?
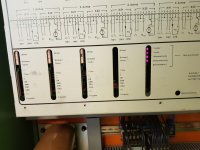
20200820_144713.jpg
On the NPP54 card there is only led D1 lit, D2 and D3 is not lit. (I have read somewhere in this forum that D2 should also be lit, can this be a clue?
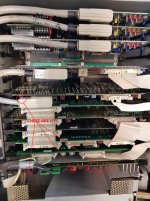
20200820_144505.jpg
Below is what I have done in troubleshooting:
(None of below made any luck in starting the machine.)

All (Fuses F1 to F8 and all the glass fuses on the boards) Fuses have been checked with ohm meter and they are all ok.

I had all boards out from their places and inspected the in detail for evidence of any kind of burns/bad contact etc.
*On all (3) TR15 boards there are resistors that got really hot but they still reads correct resistance.

I have replaced most of the larger Capacitors on the NSV56 and NSV90 boards.

I have measured the Power transducers in the Electrical cabinet:
T1: The 6 volt = 6,3 Volt.
The 12 Volt = 12,2 Volt.
The 10 Volt = 10,5 Volt.
The 220Volt = 234 Volt AC.
T2: 172 Volt AC.
T3: 20,4 Volt AC.

I have repressed/reseated all the Eproms.

I have checked all 3 batteries.
Battery on NSV90 board reads 3,9 volt (this one was bad 1,2 volt during first troubleshoot and is now replaced)
Battery on NSP56 board reads 3,67 volt.
Battery inside/under the console reads 7,5 volt.

I have tried 50 times to reset the control by the Removal of X10 interconnection tape and The power cable to NSV56 board in accordance with instructions found in this forum.

I replaced the optocoupler on NPP90 card.

My question is, do you guys believe in replacing the NSP56 card as the minibook tells me (quite expensive cards) or do you find it likely there is another problem?
If I should by a “new” card does it need to be a 256K or can I use one with more memory?

Is there anyone in Sweden that has a Dialog 4 control who is interested in swapping cards to find the faulty one? Maybe anyone has another fault code and we might find the solution for both machines together?

Machining is my hobby and not for my living so therefore its not in a rush to get this Deckel up and running, I always have my trustworthy manual Deckel FP2.

Best regards
Henrik
 

DeadMahoDude

Aluminum
Joined
Oct 30, 2016
Location
Switzerland
My FP2NC had similar fault over here:
Looking for Deckel FP2-NC Dialog4/NPP90 EPROMs

Mine had bad transistor T8 on NPP90. Maybe the same with yours, maybe not.
But "BA00 30 BA16" is usually something with the NPP90 boards in electrical cabinet, from my experience.
In case you need new EPROMs, I can send you my backup.
In case you go skiing in Switzerland, you could swap boards on my machine, usually the method with least effort to narrow down a fault. ;-)
 

chibbe

Plastic
Joined
Nov 30, 2007
Location
Stockholm / Edsbro
Hi "DeadMahoDude",

Thanks for your tip!
I did remove the T8 Transistor on the NPP90 board eventhough there was no sign of burn. Transitor tested out fine. I had a new one as a spare and replaced it anyway. But no luck this time, fault remains as pre swap of transistor.
20201008_171257.jpg

And thanks for your offer in Switzerland:D, But thats a looong trip so i keep that as very last resort in fixing this.

Best regards, Henrik
 

chibbe

Plastic
Joined
Nov 30, 2007
Location
Stockholm / Edsbro
Replace the batteries...all three before doing anything else.
Cheers Ross

Ok Ross,
I have ordered new batteries for "Sixpack in console"
and for the one on the NSP56 board. For the one in NSV board I ahd already replaced.
For the NSP56 battery I cant find the correct one "40RF310" here in sweden (only in germany and they wont ship it here due to dangerous goods), but I asume as long as its an NI-MH and 3,6volt with 250mh or more capacity it should work?

I will let you know how it turns out when I have recived and replaced them.

Best regards
Henrik
 

chibbe

Plastic
Joined
Nov 30, 2007
Location
Stockholm / Edsbro
Here is the update after the change of all batteries.
20201014_164005.jpg

When I recived the new batteries the voltage was:

For NSP56 3,6v
For NSV90 3,6v
For "sixpack 7,3v

I soldered them to their locations and put power on the machine.
Power on and same result. Only the same error codes comes to the screen as usual.

I had the power on during the night and next day i measured the voltage again, results below.

NSP56 4,15v
NSV90 4,15v
"sixpack" 8,6v

I dont know if this is normal voltage?

And of course it did not start now either.
I have tried to reset it again several times (both in mode 16 by delete button-the one next to previous and last the green one on the keyboard and by disconnect the K10 tape and power to NSV56 and back again but no change in the screen.

Anyone got any other thoughts to this problem?

Best regards Henrik
 

Colt45

Hot Rolled
Joined
Nov 27, 2004
Location
SLC, UT
Check here and make sure you have all the boards in the correct slots : https://www.practicalmachinist.com/...-mills/dialog-4-fp4nc-help-109213/#post379304

Voltages are a little high but probably OK.

After you disconnect the K10 jumper at NSV56 and reinstall it, are you resetting the control by pressing the red "Delete" button on the upper console, followed by the "Transfer" button next to it?

Should work like this- reset the K10 jumper, press the "Delete" button (lower left on the upper keypad), then "Transfer" (white button next to Delete) and the screen will give a message that says "Reinitialize?" (or something similar in German).

When that message displays, press the green "Enter" key (bottom right on the upper keypad)- the control should boot for a few seconds and then be ready to go.
 

chibbe

Plastic
Joined
Nov 30, 2007
Location
Stockholm / Edsbro
Hi Colt45,
Thanks for your tip!

I have been doing the resetting so many times my buttons will wear out. The screen never changes at all, I have tried sort of every single way of trying to get some sort of respons in my Deckel. Pushing buttons in all different sequences, standing on one leg with or without a beer etc.

I will verify all my cards are in correct spots when i get back home (off home for the weekend)eventhough I think I already done that.


Best regards Henrik
 

DeadMahoDude

Aluminum
Joined
Oct 30, 2016
Location
Switzerland
Before you get crazy, find someone local with working machine to swap cards.
Or send them to me in large box with good packaging, I'll test them on my machine and repair the broken card, if possible.

Your machine looks very nice, would be a shame if it ends up in junkyard because some silly electronic fault.
 

chibbe

Plastic
Joined
Nov 30, 2007
Location
Stockholm / Edsbro
Hi folks,

This is an update!
I started a conversation with Mr "DeadMahoDude" regarding sending my Deckel brain to him in switzerland. This is quite a long distance since Im located in Sweden. But he is a Deckel Dialog 4 owner with a working machine wich he can swap cards in narrowing the fault issue and he is a Electronic engineer!! That sounds like the perfect guy for this task.
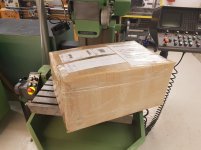
So Here I have my Deckel brain ready for shipping.
20201022_131930.jpg
20201022_141541.jpg

Hopefully he might at least find the faulty card and maybe even find the broken part of it?

I will keep you updated whenever I get my Deckel brain back.
THis will take some time probably not before next year! (long story about that)

Best regards Henrik
 

DeadMahoDude

Aluminum
Joined
Oct 30, 2016
Location
Switzerland
Cards from Hendrik arrived a few weeks ago.

Fault was indeed on NPP90 card, likely EPROMs or bad EPROM sockets, since the plastic became brittle over time and broke as I swapped EPROMs.

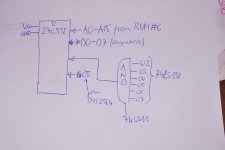
Because TMS2564 EPROMs on there are obsolete and I don't have programmer for them, I decided to swap obsolete TMS2564 EPROMs for 1x 27C512, which is readily available, cheap and about every programmer supports it.

It's actually quite simple once you know how to do it:
Address map for 6809 on there is like that:
0x0000-0x3FFF RAM/other IO stuff?
0x4000-0xDFFF ROM
0xE000-0xFFFF ROM, but with address lines A1-A5 modified by MC6828 interrupt controller chip

So edit 27C512 file with hex editor the following way:
0x0000-0x3FFF: empty, 0xFF
0x4000-0x5FFF: ROM#1/A
0x6000-0x7FFF: ROM#2/B
0x8000-0x9FFF: ROM#3/C
0xA000-0xBFFF: ROM#4/D, usually empty, 0xFF
0xC000-0xDFFF: ROM#5/E
0xE000-0xFFFF: ROM#6/F

Since the address bus is modified by MC6828 interrupt controller, you have to grab address lines from ROM#6/F, won't work otherwise, ROM#6/F and other ROMs have separate lines for A1-A5, A1-A5 for ROM#6 comes from MC6828, while the other ROMs get their address lines from 6809 microprocessor. That one was trolling me hard for a while ;-)

/CS line for 27C512 comes directly from TMS2564.

/OE line is generated by ANDing all 6 TMS2564 /OE lines together with 74LS11, is soldered on top of 74LS138 /OE decoder.

A13,A14,A15 are grabbed from input of 74LS138 /OE decoder.


That's about it, next step is to modify second card and see if it works, upgrade the other cards from Hendrik to software V2.32 and ship them back again.

DSC_0399.jpgDSC_0398.jpgDSC_0394.jpgDSC_0393.jpgDSC_0392.jpg
 

chibbe

Plastic
Joined
Nov 30, 2007
Location
Stockholm / Edsbro
What can I say!

That is top notch brain surgery in my opinion.

My earlier statement "That sounds like the perfect guy for this task"

was way beyond that.

Thanks a lot so far!
(And lets not hope it becomes a Deckelfrankenstein mill:crazy:)

Henrik
 

DeadMahoDude

Aluminum
Joined
Oct 30, 2016
Location
Switzerland
Finally got both NPP90s fixed and improved yesterday :)

I guess it was only bad transistor T5, BC548, that I missed on initial inspection and digital stuff wasn't broken at all :D
Always sucks if you don't have enough space for life measurements, so you have to guess what's broken.

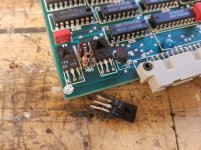
Transistor T5 switches second green LED and some other stuff with 24V, over a 1kOhm resistor. That poor 1k resistor is cramped between several other resistors and gets like 300mW, so it got fried over time and shorted out, which killed T5 transistor. PCB material became charred on both cards as well. In my opinion, that's a design fault that kills NPP90s over the years.

I removed the cramped resistors and wired some 2x1k x2 in series on top, so each one only gets like 75mW and doesn't fry the PCB. Same with the 270Ohms resistor next to it. And replaced T5, BC548.

So if you have a 'BA 00 30 BA16' error and second green LED is off on NPP90 and bottom 4 red LEDs are on, it's likely that T5 and the resistors connected to it became fried over time.

NPP90-2.jpgNPP90-3.jpgNPP90-4.jpgNPP90-5.jpg


Just realized I made a mistake with power calculation:
HEF4093 supply voltage is likely 12V or 15V, so HEF4093 output high is something about 10V-13V, which means T5 isn't switch on hard, but in linear mode.
Then T5 base is maybe at 12V, T5 emitter is at 11V, 2V drop on green LED, so 9V over 1.27k is 7mA.
T5 thereby gets 13V drop, Rs get 7.08V and 1.91V drop, LED 2V drop.
T5 power dissipation: 91mW, R: 49mW and 13mW, LED: 14mW.
Thereby more likely that T5 failed first and then the PCB got toasted by overloaded resistors.
 

chibbe

Plastic
Joined
Nov 30, 2007
Location
Stockholm / Edsbro
Hi all,

Alright here comes the happy ending! (sort of)

A few days ago I recived my Deckel brain back from mr "Deadmahodude"
I put all cards back and hit the main switch.
....Its alive!:)
Screen comes on with Scales showing and no error codes at all.
I have zero experience with this machine or any other CNC but all the axis moves moves very nice and I´m pretty sure all cards are working perfectly.
All this thanks to "deadmahodude" who did a great job!

Problems that still remains is that the X-axis scale is dirty. The V shows up next to X axis value.
20210131_150637.jpg
No wonder the scale is dirty since the console looked like this before I cleaned it.
Screenshot_20201229-092358_Gallery.jpg
So I will dig into the removal of that scale for cleaning of that area to.

The Screen is also having problem showing the top lines, dont know if there are any important information there, but if so I will later on replace that screen.

Also Change of spindle speeds has problems but I´m pretty sure this is not related to the cards and I will start another thread for this.

So thanks everyone for all tips and a special thanks to "deadmahodude"
Best regards
Henrik
 

ballen

Diamond
Joined
Sep 25, 2011
Location
Garbsen, Germany
Problems that still remains is that the X-axis scale is dirty.
So I will dig into the removal of that scale for cleaning of that area too.

I don't know what kind of scales they are. If they are Heidenhain LS803 or LS903 scales, then this thread has some information about cleaning them. It might also apply to other type of scales, but I'm not sure.

Repairing Heindenhain VRZ 753B + LS803 scales
 

AlfaGTA

Diamond
Joined
Dec 13, 2002
Location
Benicia California USA
chibbe;3704099 The Screen is also having problem showing the top lines said:
There are adjustments for the screen display, both vertical and horizontal...Perhaps yours just needs a bit of adjustment to get a full display....
Have a look at the right side of the CRT assembly. There should be a cardboard insulator board on the side of the assembly.

There are a number of holes in that board which allow access to adjustable resistors behind....
Counting from the rear (closest to you ) the 4th hole from the rear should adjust the vertical position, ("22" if memory serves)
The 3rd hole gives access to an adjustment for the vertical size ("25")....(might be other way around...can't remember)

The 7th hole changes the horizontal.....("L1")

There is a hidden bolt that holds the scale reader head to the machine.....There is a rubber plug on the face of the operators side vertical plate gib, facing the "Z" hand wheel.
Hole should be about 3" below the top of the vertical slide and toward the outside edge.....
Down the hole covered by that plug is a Allen bolt (5mm hex) that holds the carrier fro the read head of the "X" axis scale.
Easier to remove that screw (its pretty far inside) is to remove the operators side panel.
Position the "X" axis about 1/3 of its travel on the "X plus" side Unsnap the bellows from the vertical slide on both sides of the "X".....
Should be able to see the scale on both sides of the vertical slide ...remove the bolt at each end of the scale.
Remove the operators side end cover off the "X" axis, with the hand wheel...will require removal of the hand wheel drive gear from the hand wheel stub shaft.
Will expose a window in the end casting of the "X" slide that will allow removal of the scale.....
Will need to remove the cable all the way including the area where it passes into the vertical casting...requires some covers to be removed...take photos of the routing before removal....
Its a bit busy in there and when replaced the cable needs to be routed to avoid snagging when the "Z" axis moves.....

On reassembly, the scale nests on locating pads so no indicating is needed to get it straight and flat, just bias the scale up against the pads and fit the retaining bolts at each end...
The read head fits on a dedicated mounting plate that nests on a taper in the vertical slide, as with the scale the read head is self aligning......
Be careful to not push the read head bracket in too deep, there are two bolt holes in the mounting plate...you need to use the hole to the left as installed and the end of the mount should be just proud of the
vertical slide casting i think.....

Good luck.....


Cheers Ross
 

chibbe

Plastic
Joined
Nov 30, 2007
Location
Stockholm / Edsbro
Hi Ross,

Thanks a lot for your deep explanation of my issues.
So there might be a saving of my Screen:scratchchin:
I will dig into them both and come back when I have results.

Best regards
Henrik
 

chibbe

Plastic
Joined
Nov 30, 2007
Location
Stockholm / Edsbro
Hi Ross,

I got my screen working perfect! :D
I think you rememberd those holes correctly.
But the one that fixed my problem was the adjustable resistor closest to the screen (closest to the operator). (that one seemed to make the top of the screen taller, (before adjustment it was more or less just a line.

Before my adjustment it took like 2 minutes before I could read the X scale values. Now its like 15 seconds and now it shows up speed settings wich I couldnt see at all before.

Thanks a lot for this easy to fix problem.

Best regards
Henrik


Top