What's new
What's new

Measuring a ring gauge ?

Hbjj

Cast Iron
Joined
Mar 18, 2013
Location
Washington st
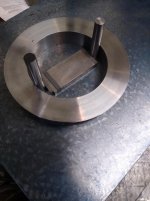
I have a shop made ring that I want to measure as accurately as I can.
My idea was to set the ring on a pin mounted to a 90° block first measure the pin height with a .0001 indicator and a guage block stack then find the low point in the ring with the indicator and make that block stack then subtract the small stack from the large and I get 2.6022 .

I get 2.6028 ish with telescoping guage and micrometer.

I have a full accessories set of gauge block tools ect

How would you measure a ring to close tolerance?
20211118_163516.jpg
 

RJT

Titanium
Joined
Aug 24, 2006
Location
greensboro,northcarolina
Sunnen bore gage, Brown and Sharpe tri mics, or digital motorized height gage depending on how accurate you want to measure it. Telescoping gages less than .0005" are subject to interpreting the "feel" of the pressure they exert. Too much room for error. When you check a telescoping gage against something more repeatable and accurate, you will see the inaccuracy at that level of precision. +/- .001 is a whole different class of measurement and precision than measuring in tenths IMHO. We make gages using 1 micron indicators or LVDTs so I have some experience in this realm of measurement.
 

Hbjj

Cast Iron
Joined
Mar 18, 2013
Location
Washington st
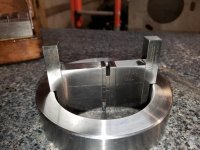
I'm trying to get to a more fundamental level

How do I originate a ring guage measurement from guage blocks.

Once I (know) what the ring is I can set my bore guage and check that it actually measures to size.

It's sort of a chicken and egg deal

Ps all this so I can see how my homemade bore guage performs
20211118_174846.jpg20211118_174857.jpg
 

Hbjj

Cast Iron
Joined
Mar 18, 2013
Location
Washington st
Yes I did that ^ and I get about a +.0002 difference vs the indicator method.

Contact pressure?

How were ring guages measured in pre cmm era?
 

Conrad Hoffman

Titanium
Joined
May 10, 2009
Location
Canandaigua, NY, USA
I have this same issue and no budget for good bore gages. You need too many of the darn things anyway. There are several systems like this- Octagon Precision | LMM 600 : ULMM
I assume they're zero'd with a gage block stack. It seems like, as long as you have some type of precision linear encoder, you could build something similar. I'd envision a small linear stage with an encoder and with a post and ball on top. A fixed post and ball mounted nearby would be the other contact. Calibrate it with a gage block stack (internal, with overhanging blocks on each end) and then measure the ring gage. No idea how close one could get but I think doing better than a couple tenths is difficult.
 

ballen

Diamond
Joined
Sep 25, 2011
Location
Garbsen, Germany
There is a neat device called a Talyrond, which measures how round an ID or an OD is, and gives you a profile of the deviations. "Normal resolution" is 30 nanometers (a bit more than one one-millionth of an inch). I think it might also do absolute measurements of diameter, though not at that precision.
 

michiganbuck

Diamond
Joined
Jun 28, 2012
Location
Mt Clemens, Michigan 48035
If nothing better and having a decent lathe you might make a male gauge with considering .0002 for feel fit.

OD is easier to JoBlock and surface plate check.

JoBlocks try stack and a couple of dowels might get .0002 close
 

ttrager

Aluminum
Joined
Jul 23, 2015
Location
East Side / Detroit
I have a shop made ring that I want to measure as accurately as I can.
My idea was to set the ring on a pin mounted to a 90° block first measure the pin height with a .0001 indicator and a guage block stack then find the low point in the ring with the indicator and make that block stack then subtract the small stack from the large and I get 2.6022 .

I get 2.6028 ish with telescoping guage and micrometer.

I have a full accessories set of gauge block tools ect

How would you measure a ring to close tolerance?
View attachment 335171

"How would you measure a ring to close tolerance?"

Send it out to be certified, if the idea is you are going to trust it for "close tolerance" work.
 

jccaclimber

Hot Rolled
Joined
Nov 22, 2015
Location
San Francisco
There is a neat device called a Talyrond, which measures how round an ID or an OD is, and gives you a profile of the deviations. "Normal resolution" is 30 nanometers (a bit more than one one-millionth of an inch). I think it might also do absolute measurements of diameter, though not at that precision.

I've spoken with Taylor Hobson about Talyronds, and have also had them do contract measurement work. They are fantastic on roundness, but they are *not* accurate on diameter at this level.

I've done curvature on a Talysurf, but of course the part needs to be squared up and you can only get a segment of the curve (from which I derived a curvature-->diameter, but I was just doing a sanity check, not validating a diameter).

Once the part stops being a cylinder(eg, a ball bearing) even a Talysurf ends up off on diameter if you aren't careful. Not because the machine is incapable, but because they don't have equal accuracy on all 3 axes and you need to be exactly on center when you're talking a micron or so of diameter error.
 
Last edited:

Hbjj

Cast Iron
Joined
Mar 18, 2013
Location
Washington st
I'm using this (guage) to check that my bore guages read properly on a block stack vs round guage so actual size isn't important just that i (know) what the size is

My old spi bore guage reads .0006 large on a ring vs a stack...? and my homemade around the boring bar guage reads the same!

I made a note on my spi box on how to set the guage so it reads accurately its not ideal but I'm unsure as to how to fix it.

The job im setting up for here is lineboring a couple type 1 vw engine blocks.
the factory tolerance on the mains is .0007

It's going ok but I'm not super happy with my finish there looks to be a pattern of feed lines at .010 ish spacing when I'm feeding at .0015..?20211130_093720.jpg
My homemade gauge from the back 20211118_174742.jpg
 

jccaclimber

Hot Rolled
Joined
Nov 22, 2015
Location
San Francisco
Use 3 gage pins and draw it in cad it will tell you the diameter
Don


Sent from my iPhone using Tapatalk Pro

Careful with this. Most of the shop gauge pins I’ve seen have 0.005 mm of tolerance per pin. If you can characterize your specific pins better than that and have the right pins on hand it works, but I suspect pins over gauge blocks or the OP’s method would be more accurate. This is usually ok for nearest 0.001”, but not a lot better.
 

D Nelson

Stainless
Joined
Jan 7, 2015
Location
Missouri Ida
Careful with this. Most of the shop gauge pins I’ve seen have 0.005 mm of tolerance per pin. If you can characterize your specific pins better than that and have the right pins on hand it works, but I suspect pins over gauge blocks or the OP’s method would be more accurate. This is usually ok for nearest 0.001”, but not a lot better.

Measure the pins first I’d say you can get pretty darn close
Don


Sent from my iPhone using Tapatalk Pro
 

Milling man

Cast Iron
Joined
Aug 6, 2021
Location
Moscow, Russia
I have a shop made ring that I want to measure as accurately as I can.
My idea was to set the ring on a pin mounted to a 90° block first measure the pin height with a .0001 indicator and a guage block stack then find the low point in the ring with the indicator and make that block stack then subtract the small stack from the large and I get 2.6022 .

I get 2.6028 ish with telescoping guage and micrometer.

I have a full accessories set of gauge block tools ect

How would you measure a ring to close tolerance?
View attachment 335171
There is a very accurate, and at the same time quite easily repeatable in the garage, method for measuring very accurate internal diameters.
It can be seen here ACE 에이스정밀연마 내경초정밀연마 에어마포스게이지 전수검사 - YouTube

The ring is put on a pin of exactly known diameter, air is supplied between the ring and the pin. From the air flow rate, you can find out the difference between the pin diameter and the ring diameter.

An old and wise turner who used to work in our laboratory told me that such a device was made at the factory where he worked before and it was very easy. They didn't have precise rings (they didn't have any), they could only make a precise pin and measure its outside diameter.
An air flow meter with very high resolution is not difficult to make on your own.
But, to work according to this scheme, you will need at least one reference ring with a known diameter. In books on precision measurements, I came across formulas for calculating air flow depending on the gap between the base pin on which the ring is put on and the ring itself. That is, theoretically, you do not need a reference ring. But in practice, it's better to first measure something with a known size :)
Of course, this idea only makes sense if you really need to measure this ring to an accuracy of about 0.00005 inches.
 

jccaclimber

Hot Rolled
Joined
Nov 22, 2015
Location
San Francisco
I’ve used a lot of air gauges, but never tried to DIY one, that’s an interesting idea. One word of caution, you can make the read value on an air gauge change a tenth with changes in surface roughness, so consistency is key as always.


Top